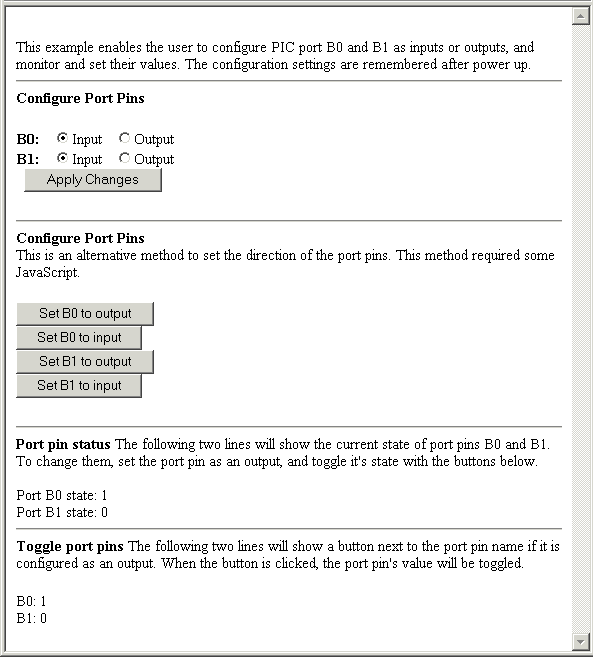
The "../src/webpages/html_io" folder contains a web page that demonstrates how to set port pins as inputs or outputs. It also shows how to set the value of output port pins via a button on the web page. It consists of the following files:
The example consists of two files because tags are not parsed in htm files, but only in cgi files. All tags are placed in the cgi file. They will be replaced with dynamic values by the web server when a browser requests the page.
<html>
<head>
<title>Very simple PIC port example</title>
</head>

<!-- Place all code containing % tags in main.cgi file. This has to be done seeing that -->
<!-- htm files are not parsed for % tags by default, but only cgi files! -->
<iframe name=main src="main.cgi" height="100%" width="100%" scrolling="no" frameborder=0></iframe>

</body>
</html>
<html>
<head>
<meta http-equiv="Pragma" content="no-cache">
<title>Modtronix SBC65EC Demo Web Server</title>
<script type="text/javascript">
<!-- The following function will display a button if the given port pin is configured as an -->
<!-- output, or show the port pin value as "0" or "1" if it is configured as a input -->
function ln(io,val,name) {
document.write("<td align=center>");
if(io==0) {
document.write("<input type=submit value="+val+" name=\""+name+"\">");
}
else {
document.write(val);
}
document.write("</td>");
}
<!-- Executes given HTTP GET command. -->
function execCmd(name, value) {
window.location = document.getElementById("formCfgPin").action
+ "?" + name + "=" + value;
}
</script>
</head>
<body marginwidth="0" marginheight="0" topmargin="0" bottommargin="0" leftmargin="0" rightmargin="0">
<br>This example enables the user to configure PIC port B0 and B1 as inputs or outputs, and monitor and set
their values. The configuration settings are remembered after power up.
<hr>
<b>Configure Port Pins</b>
<form method="GET" action="main.cgi">
<b>B0: </b><input %b48 type=radio value="1" name="bc0r">Input <input %b40 type=radio value="0" name="bc0r">Output
<br><b>B1: </b><input %b49 type=radio value="1" name="bc1r">Input <input %b41 type=radio value="0" name="bc1r">Output
<br> <input type=submit value="Apply Changes">
</form>
<hr>
<b>Configure Port Pins</b>
<br>This is an alternative method to set the direction of the port pins. This method required
some JavaScript.
<form id="formCfgPin" method="GET" action="main.cgi">
<input type=button value="Set B0 to output" onclick="execCmd('bc0r','0')">
<br><input type=button value="Set B0 to input" onclick="execCmd('bc0r','1')">
<br><input type=button value="Set B1 to output" onclick="execCmd('bc1r','0')">
<br><input type=button value="Set B1 to input" onclick="execCmd('bc1r','1')">
</form>
<hr>
<b>Port pin status</b>
The following two lines will show the current state of port pins B0 and B1. To change them, set
the port pin as an output, and toggle it's state with the buttons below.
<br><br>Port B0 state: %b00
<br>Port B1 state: %b01
<hr>
<b>Toggle port pins</b>
The following two lines will show a button next to the port pin name if it is configured as an output.
When the button is clicked, the port pin's value will be toggled.
<form method="get" action="main.cgi">
<!-- The following tags are use, documentation is for port B0: -->
<!-- b50: This tag will be replaced by '0' if port B0 is output, or '1' if it is an input -->
<!-- b00: This tag is replaced by '1' if port B0 is set, or '0' if port value is 0V -->
<!-- The 'bx0' and 'bx1' are CGI commands, and will set or clear the given port pin -->
B0: <script type="text/javascript">ln(%b50,%b00,"bx0");</script>
<br>B1: <script type="text/javascript">ln(%b51,%b01,"bx1");</script>
</form>
<hr>


 1.5.8
1.5.8