Modtronix Network Bootloader Application
Introduction
The Modtronix Network Bootloader is an utility for updating the firmware and web pages on a Modtronix Ethernet enabled board. No PIC programmer is required. Currently only the SBC65EC and SBC68EC boards programmed with the Modtronix Bootloader are supported.
The program consists out of two tabs. The "Firmware Update" tab is used for updating firmware on a target board via the network. The "Web Page Update" tab is used for compiling standard HTML web pages into a "File System Image", and uploading them to the board via FTP. See the Ethernet board's source code documentation for further details on modifying the web pages.
Downloads
Click here for the Windows version of the Modtronix Network Bootloader. Unzip the download into a folder on your computer, and use "netloader.exe" and "netix.exe" executables in the bin folder.
Updating The Firmware
The Modtronix Network Bootloader uses the UDP protocol to update the firmware on the target board. The new firmware has to be in a hex file. The hex file for the latest firmware can be downloaded from the Modtronix web site, or created by compiling the source code obtained from the Modtronix web site. For downloads, see links on the relevant product pages. No PIC programmer is required. The SBC board used must have a bootloader installed on it. Such a board can be identified by a BLN Vm.nn label on the front of the board - normally stuck on the RTL8019AS 100 pin network chip. Where Vm.nn is the version number of the bootloader.
To update the firmware, follow the following steps:
- Ensure the target board (SBC65EC, SBC68EC...) is connected to the network, and switched off (no power applied).
- Download, install and start the Modtronix Network Bootloader from link on top of this page.
- Enter the IP address or NetBIOS name in the "Target IP Address" field. The default NetBIOS name for Modtronix Ethernet boards is MXBOARD, and the default IP address (if DHCP is disabled) is "10.1.0.1".
- Load the the new firmware (has to be a hex file) by clicking on the "Browse" button.
- Click on the "Connect" button. This will start sending UDP packets onto the network trying to connect with the bootloader on the target board.
- Apply power to the target board.
- You should now see progress information being displayed in the "Message Window". This information should notify you that a connection to the target board has been established, and show the progress of programming.
- When finished, the target will automatically be reset, and will start up with the new firmware.
Updating The Firmware From A Remote Location
The procedure for updating the firmware is:
- Start the Modtronix Network Bootloader program, select the desired IP address and hex file, and click the "Connect" button. It will now start searching for the bootloader device
- Reset the target board. This can be done by applying power to it, or clicking the reset button on the target board's web interface. The board will now remain in bootloader mode for the configured time. This time is configured via the web interface of the target board.
- The Modtronix Network Bootloader should now find the device, and establish a connection.
- After connected, click on the "Update Firmware" button to update the firmware. After successfully updating the firmware, the target board will be reset.
- Finished
If not successful, the target device will remain in bootloader mode until a valid program is received, and it receives a reset command from the Modtronix Network Bootloader. The target device will confirm each block of data that it receives and programs. The Modtronix Network Bootloader will confirm that the board programmed itself with valid data, and when finished, send it a reset command. This method of handshaking between the Modtronix Network Bootloader and target board ensures error free programming of the target board.
Details
Uploading Web Pages
Before web pages can be uploaded, they have to be compiled to a File System Image (*.img) file. A File System Image is a single file that contains all web pages. The File System Image can be uploaded to the target Ethernet Board by one of the following methods:
- Modtronix Network Bootloader: The simplest method is to use the built in FTP server of the Modtronix Network Bootloader. Simply click on the "Upload Webpages" button, and the selected File System Image is uploaded to the board at the given IP address or NetBIOS name. The default NetBIOS name for Modtronix Ethernet boards is MXBOARD, and the default IP address (if DHCP is disabled) is "10.1.0.1". For some versions of Windows, this process might take a couple of second if the "NetBIOS over TCP/IP" options for your network connection is enabled. To speed up the process, disable "NetBIOS over TCP/IP" for your active network connection.
- FTP Client: A FTP client can be used to connect to the target board and upload the File System Image. The default user name is admin and the password is pw. After connecting to the target board, simply upload the entire File System Image file. After doing this, the target will contain the new Web pages.
- Xmodem Protocol: A Terminal program capable of sending files via the Xmodem protocol can be used to send the File System Image file to the target. For this to work, the target has to be connected to the PC running the Terminal program (HyperTerminal on Windows for example) via it's RS232 port. After powering up the target board, enter RS232 configuration mode by following the instructions displayed on the Terminal program. Then select "Download File System Image" from the menu, and send the created "File System Image" file via the Xmodem protocol. In HyperTerminal, this can be done by selecting the "Send File..." menu item in the "Transfer" menu. This will open the "Send File" dialog box. Select Xmodem protocol, and send the "File System Image" file created with the Modtronix Network Bootloader program. After doing this, the target will contain the new Web pages.
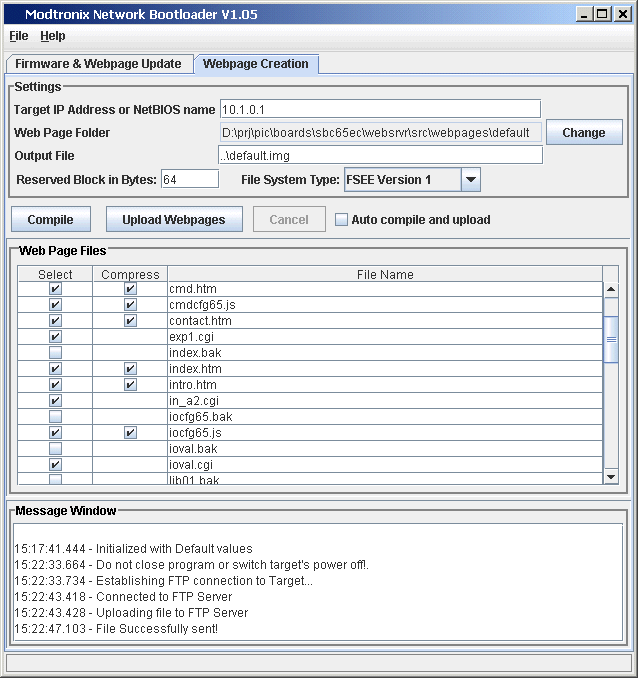
Creating and Uploading Web Pages
- FSEE: This is the default file system for the modtronix SBC65EC and SBC68EC Ethernet enabled boards. This file system allows for a total size of 16 MBytes and a maximum file size of 64 KBytes. All files have to be located in the same directory, and file names have to be in 8.3 format (max 8 character name and max 3 character extension).
- FSEE16M: This is a variation of the default FSEE file system. This file system allows for a total size of 16 MBytes and a maximum file size of 16 MBytes. All files have to be located in the same directory, and file names have to be in 8.3 format (max 8 character name and max 3 character extension). To use this file system, the firmware running on the target has to be compiled for this File System.
This file system supports compressed HTML files.
This file system supports compressed HTML files.
The ../src/webpages/default folder in the source code available for most Modtronix Ethernet enabled boards will contain the default web pages that are present on the board. These web pages are in standard HTML format, and can be modified by the user. To create a File System Image that can be downloaded to the target board, do the following:
- Start the Modtronix Network Bootloader program, and select the "Update Web Pages" tab.
- Select the folder that contains the Web pages you want to upload to the target board. Click on the "Change" button next to the "Web Page Folder" text field to do this.
- Ensure the output file is correct. The default is to place the compiled File System Image in the same folder as the source Web pages in a file called "image.img"
- In the list of Web Page Files select all files that should be included in the created File System Image. Some files will have Compress check boxes that can be checked. By checking this box, the selected file will be compressed with GZIP, and it's file extension changed to indicate to the HTTP server on the target board that it is a compressed file. The HTTP server will send all compressed files using HTTP compression. All modern browsers support this feature. It is recommended that all files that support HTTP compression (has the check box) be compressed. HTTP compression is transparent to the user, and no changes have to be made to the Web pages.
- Ensure the Reserved Block has the correct size for the firmware used. All Modtronix Ethernet enabled boards use a Reserved Block size of 64. Ensure this value is 64 unless the firmware has been recompiled with a different value!
- Click on the Compile button. This will compile the Web pages, and place the File System Image in the given file. The message window should state that the file was created.
- Click on the Upload Web Page button. This will upload the File System Image file to the target Ethernet Board via FTP.
Screenshots
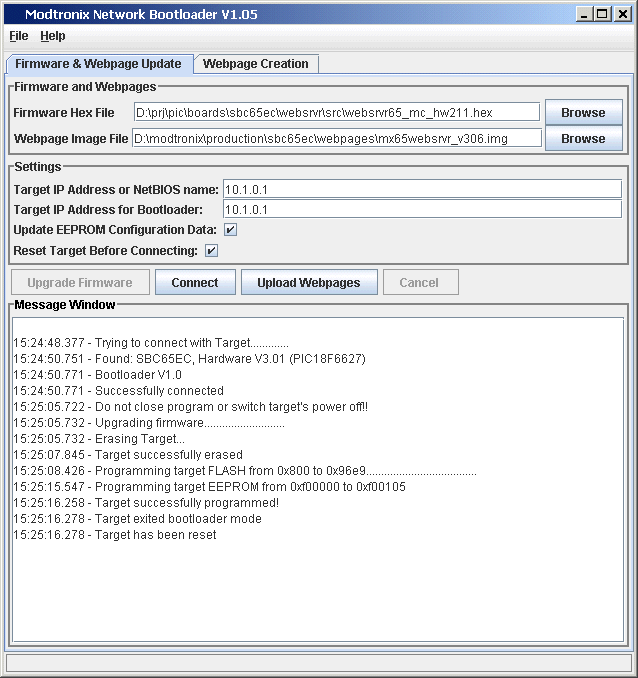
The Following screen shot is of the Firmware & Webpage Update tab of the Modtronix Network Bootloader.
The Following screen shot is of the Webpage Creation tab of the Modtronix Network Bootloader.